Lasagne Lattice Pie

Lasagne Lattice Pie

It’s Pie Season.

I guess pie is always in season, but right now it’s pie with crust season. I’ve never been a dessert pie lover, other than my mom’s apple pie, or a summer fruit pie with an oat and brown sugar crumble top. But the idea of working with my hands to make a pie and craft the top was definitely appealing. I got the idea to make Lasagne Lattice Pie just as I was falling asleep one night, and I’ve been trying my hand at it regularly since.

My family has eaten a ton of lasagne lately! We’ve now reached the point where two things have happened; First, my kids have let it be known that they’ve had their fill of lasagne for a while. And second (and most importantly) the recipe and the process are done and where we all love it!

Here I’ve used lasagne sheets that I sliced into thick ribbons. I didn’t even know that I could buy lasagne sheets like this, actually. I went to a local market that sells their own fresh pasta and requested it. It didn’t seem like an unusual request, so clearly I haven’t been in the ‘lasagne know’ until now! I bought two pounds of it and started experimenting.

Lasagne Lattice Pie

First I made a sauce. My absolute favorite non-summer tomato sauce is simple as can be. All you need is:

1 28 ounce can of tomatoes (see the note below)
2 small cloves of chopped garlic
1 tablespoon olive oil
1/2 teaspoon kosher salt
1/4 cup fresh basil leaves
Pepper to taste
Red chili flakes (optional, to taste)

Heat a sauce pan to medium high heat. Add the olive oil. Bring the heat back up to medium high and add the chopped garlic. Let them get a slight sear on one side and turn the heat down to medium. Slowly add the tomatoes, including all juices. Adjust the heat down if this continues to splatter. Stir to combine, with the salt. Let that cook together for about 20-25 minutes, stirring occasionally. Add the basil and continue to cook on low for another 10 minutes. Serve with pepper or chili flakes.
Note: I love to use whole, unseasoned canned tomatoes. When this sauce has finished cooking, I give it a few pulses with my hand blender to get it to my desired consistency. If I can’t find those, I use unseasoned pureed or strained tomatoes.

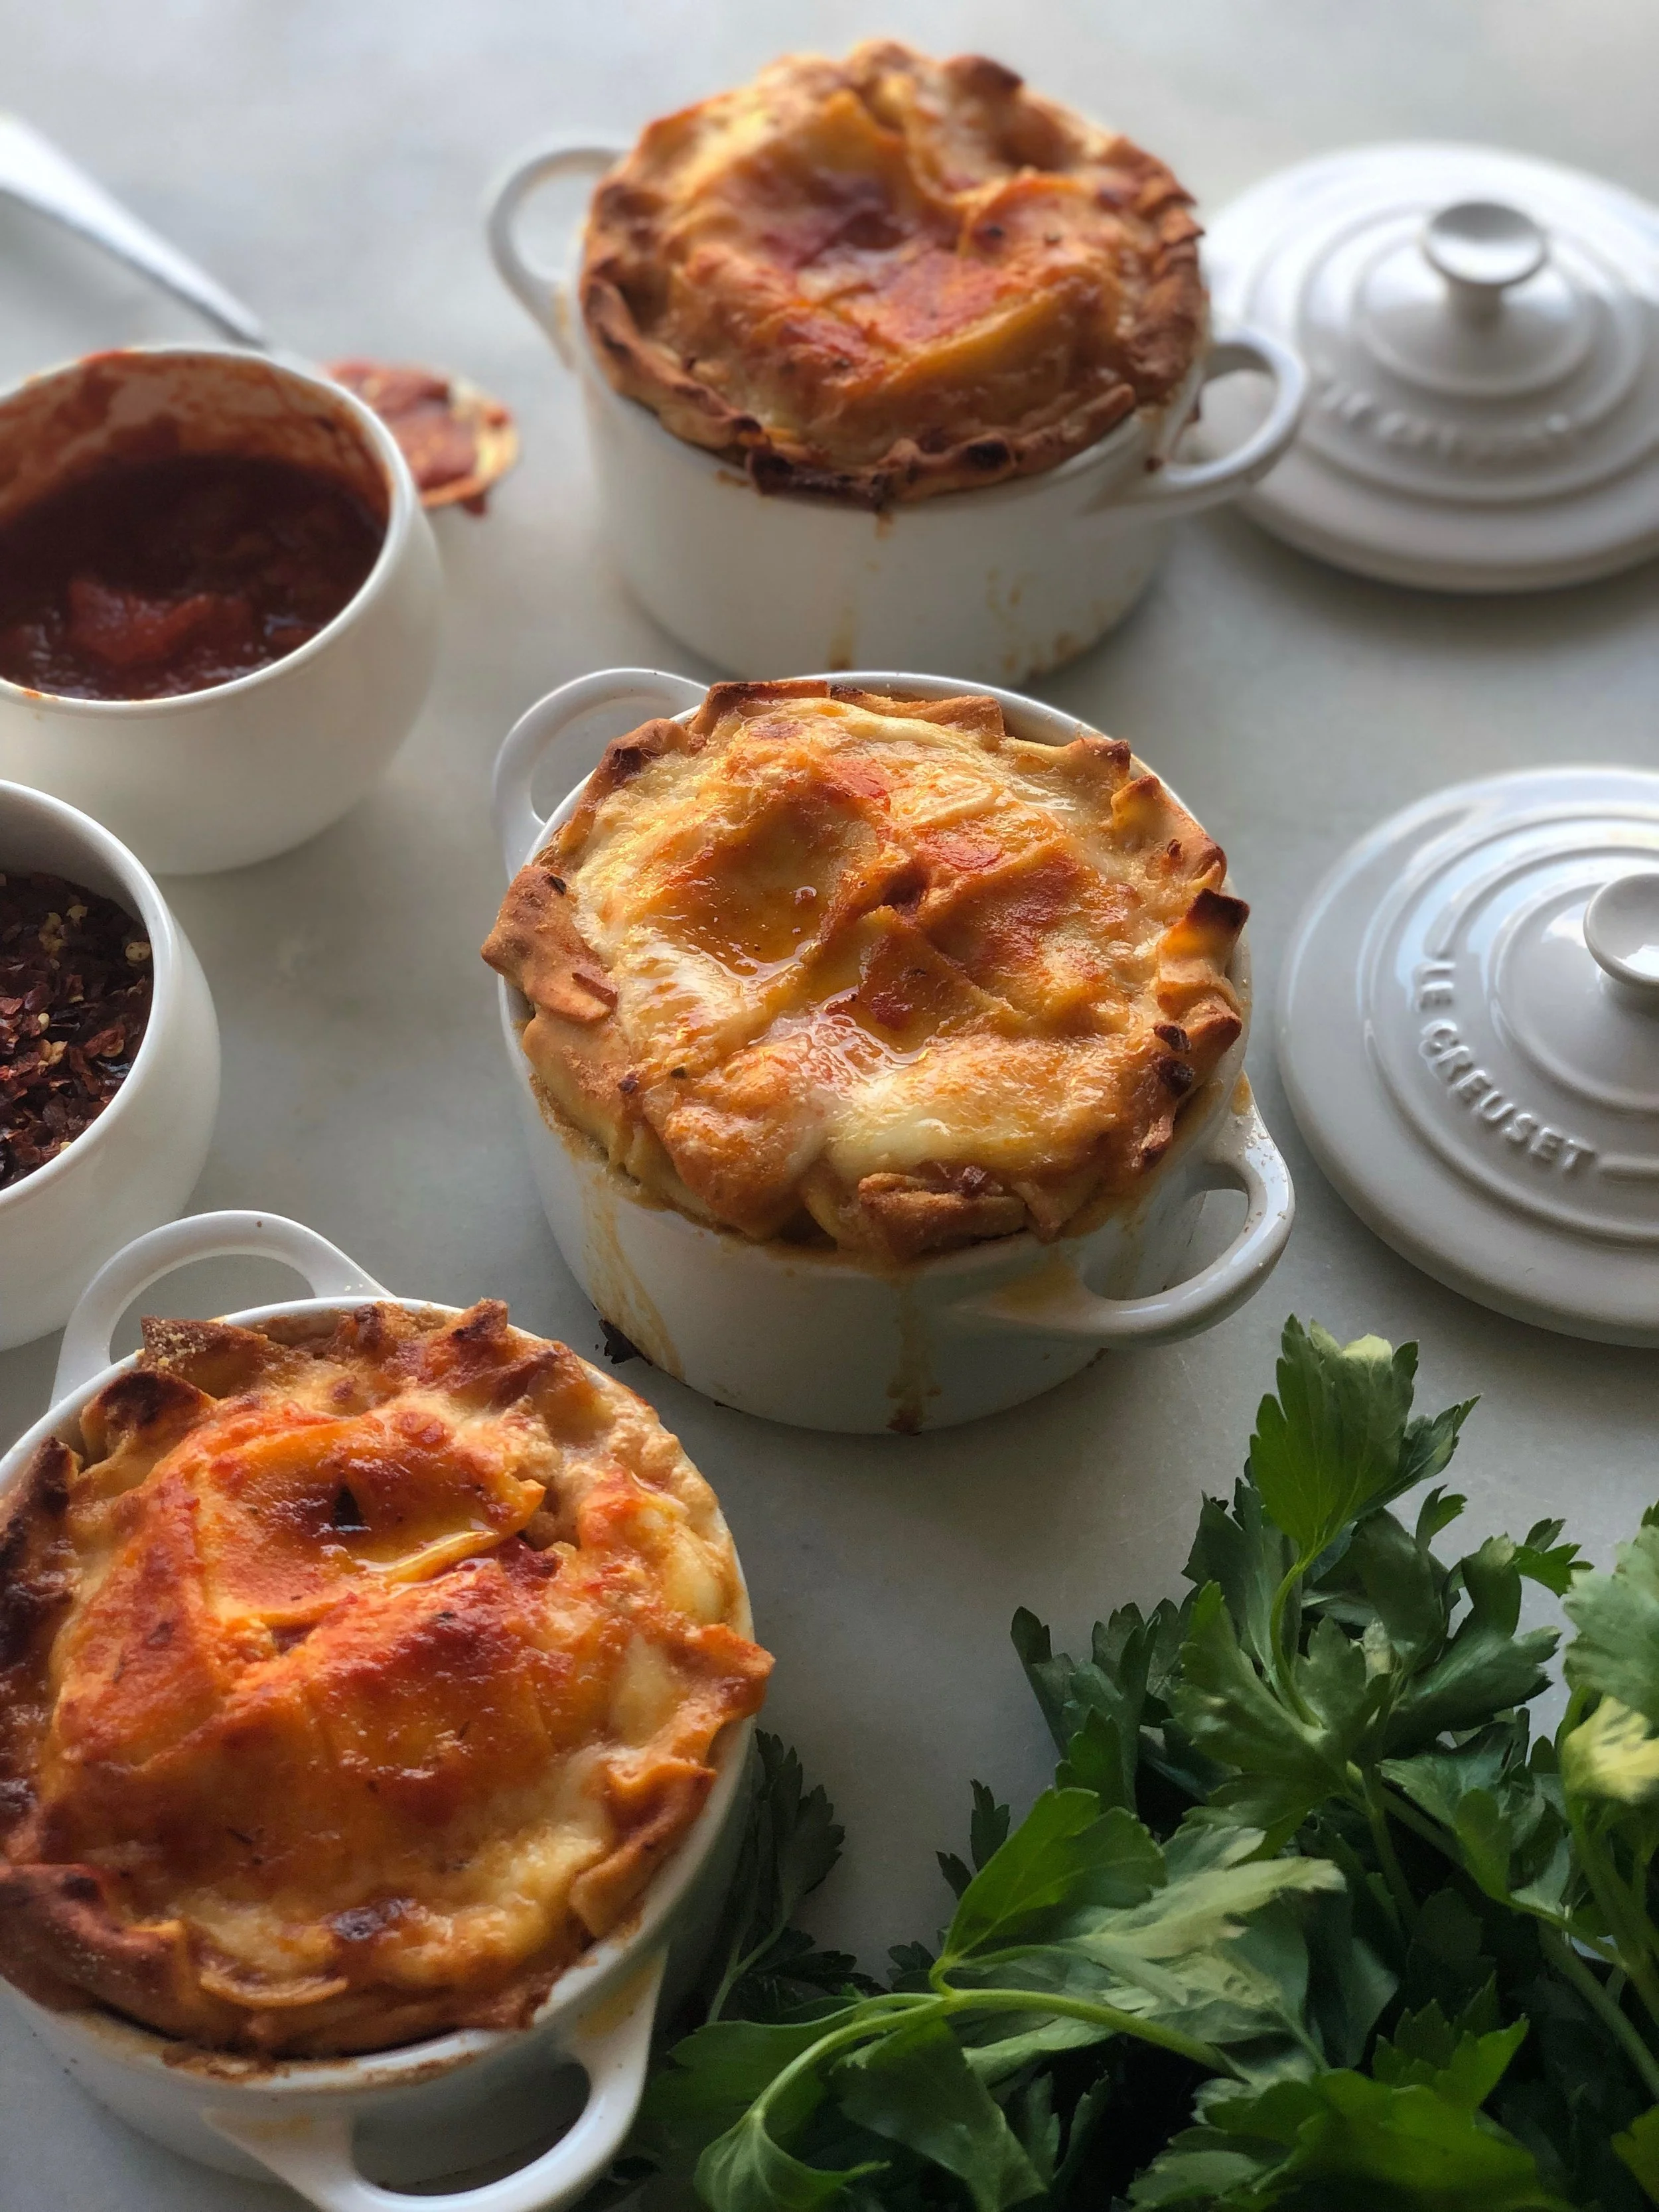
So back to that Lattice Lasagne Pie. I decided to weave strips of the lasagne into a lattice pattern and play with the shape, the ingredients on top and cooking technique to get it right. Truthfully, I wish that the lattice showed through better. But the thing about lasagne that makes it so irresistible is that cheesy, absolute comfort food appeal of the top. Right? Those bubbly bits with the perfect ratio of cheese to sauce to noodle are everything! That’s what I wanted, PLUS the cool lattice appeal of pie-meets-lasagne.

In the end, this recipe works beautifully because the noodles are al dente, the sauce is tasty and plentiful, the cheese is creamy and bubbly but not overpowering and the design is neat. Perfect for entertaining. Ideal for potlucks. A great idea for a new parent. An awesome twist on a family favorite.

Lasagne Lattice Pie ingredients

Lasagne Lattice Pie

Here’s what you need:

1 pound lasagne sheets (size will depend on your baking dish. see note below)
2/3 cup fresh whole milk ricotta
1 large egg
1 1/2 cups tomato sauce, divided (see recipe above)
1/2 medium zucchini, cut into 1/4 inch thick slices
1/2 cup fresh basil leaves cut into strips
3/4 cup shredded whole milk mozzarella
1 pound ground turkey
2 cloves garlic, sliced
olive oil

Preheat the oven to 375.
Sauté sliced garlic in 1 tablespoon of olive oil on medium heat. After 1-2 minutes or at the point when you see delicious light brown edges on your garlic slices, add the ground turkey. I like to leave some variation in size of the chunks, because the unpredictability of the little pockets tucked away underneath those noodles is part of what makes lasagne interesting to me. Cook thoroughly, time will depend on the largest size of your chunks. Combine with 1/2 cup of sauce (see recipe above).

Grease a 10 inch oval baking dish with olive oil on the bottom and sides.
In a medium bowl, combine the ricotta and egg with 1/2 cup of the tomato sauce. Set aside.


Assembling the lasagne layers (see note below)

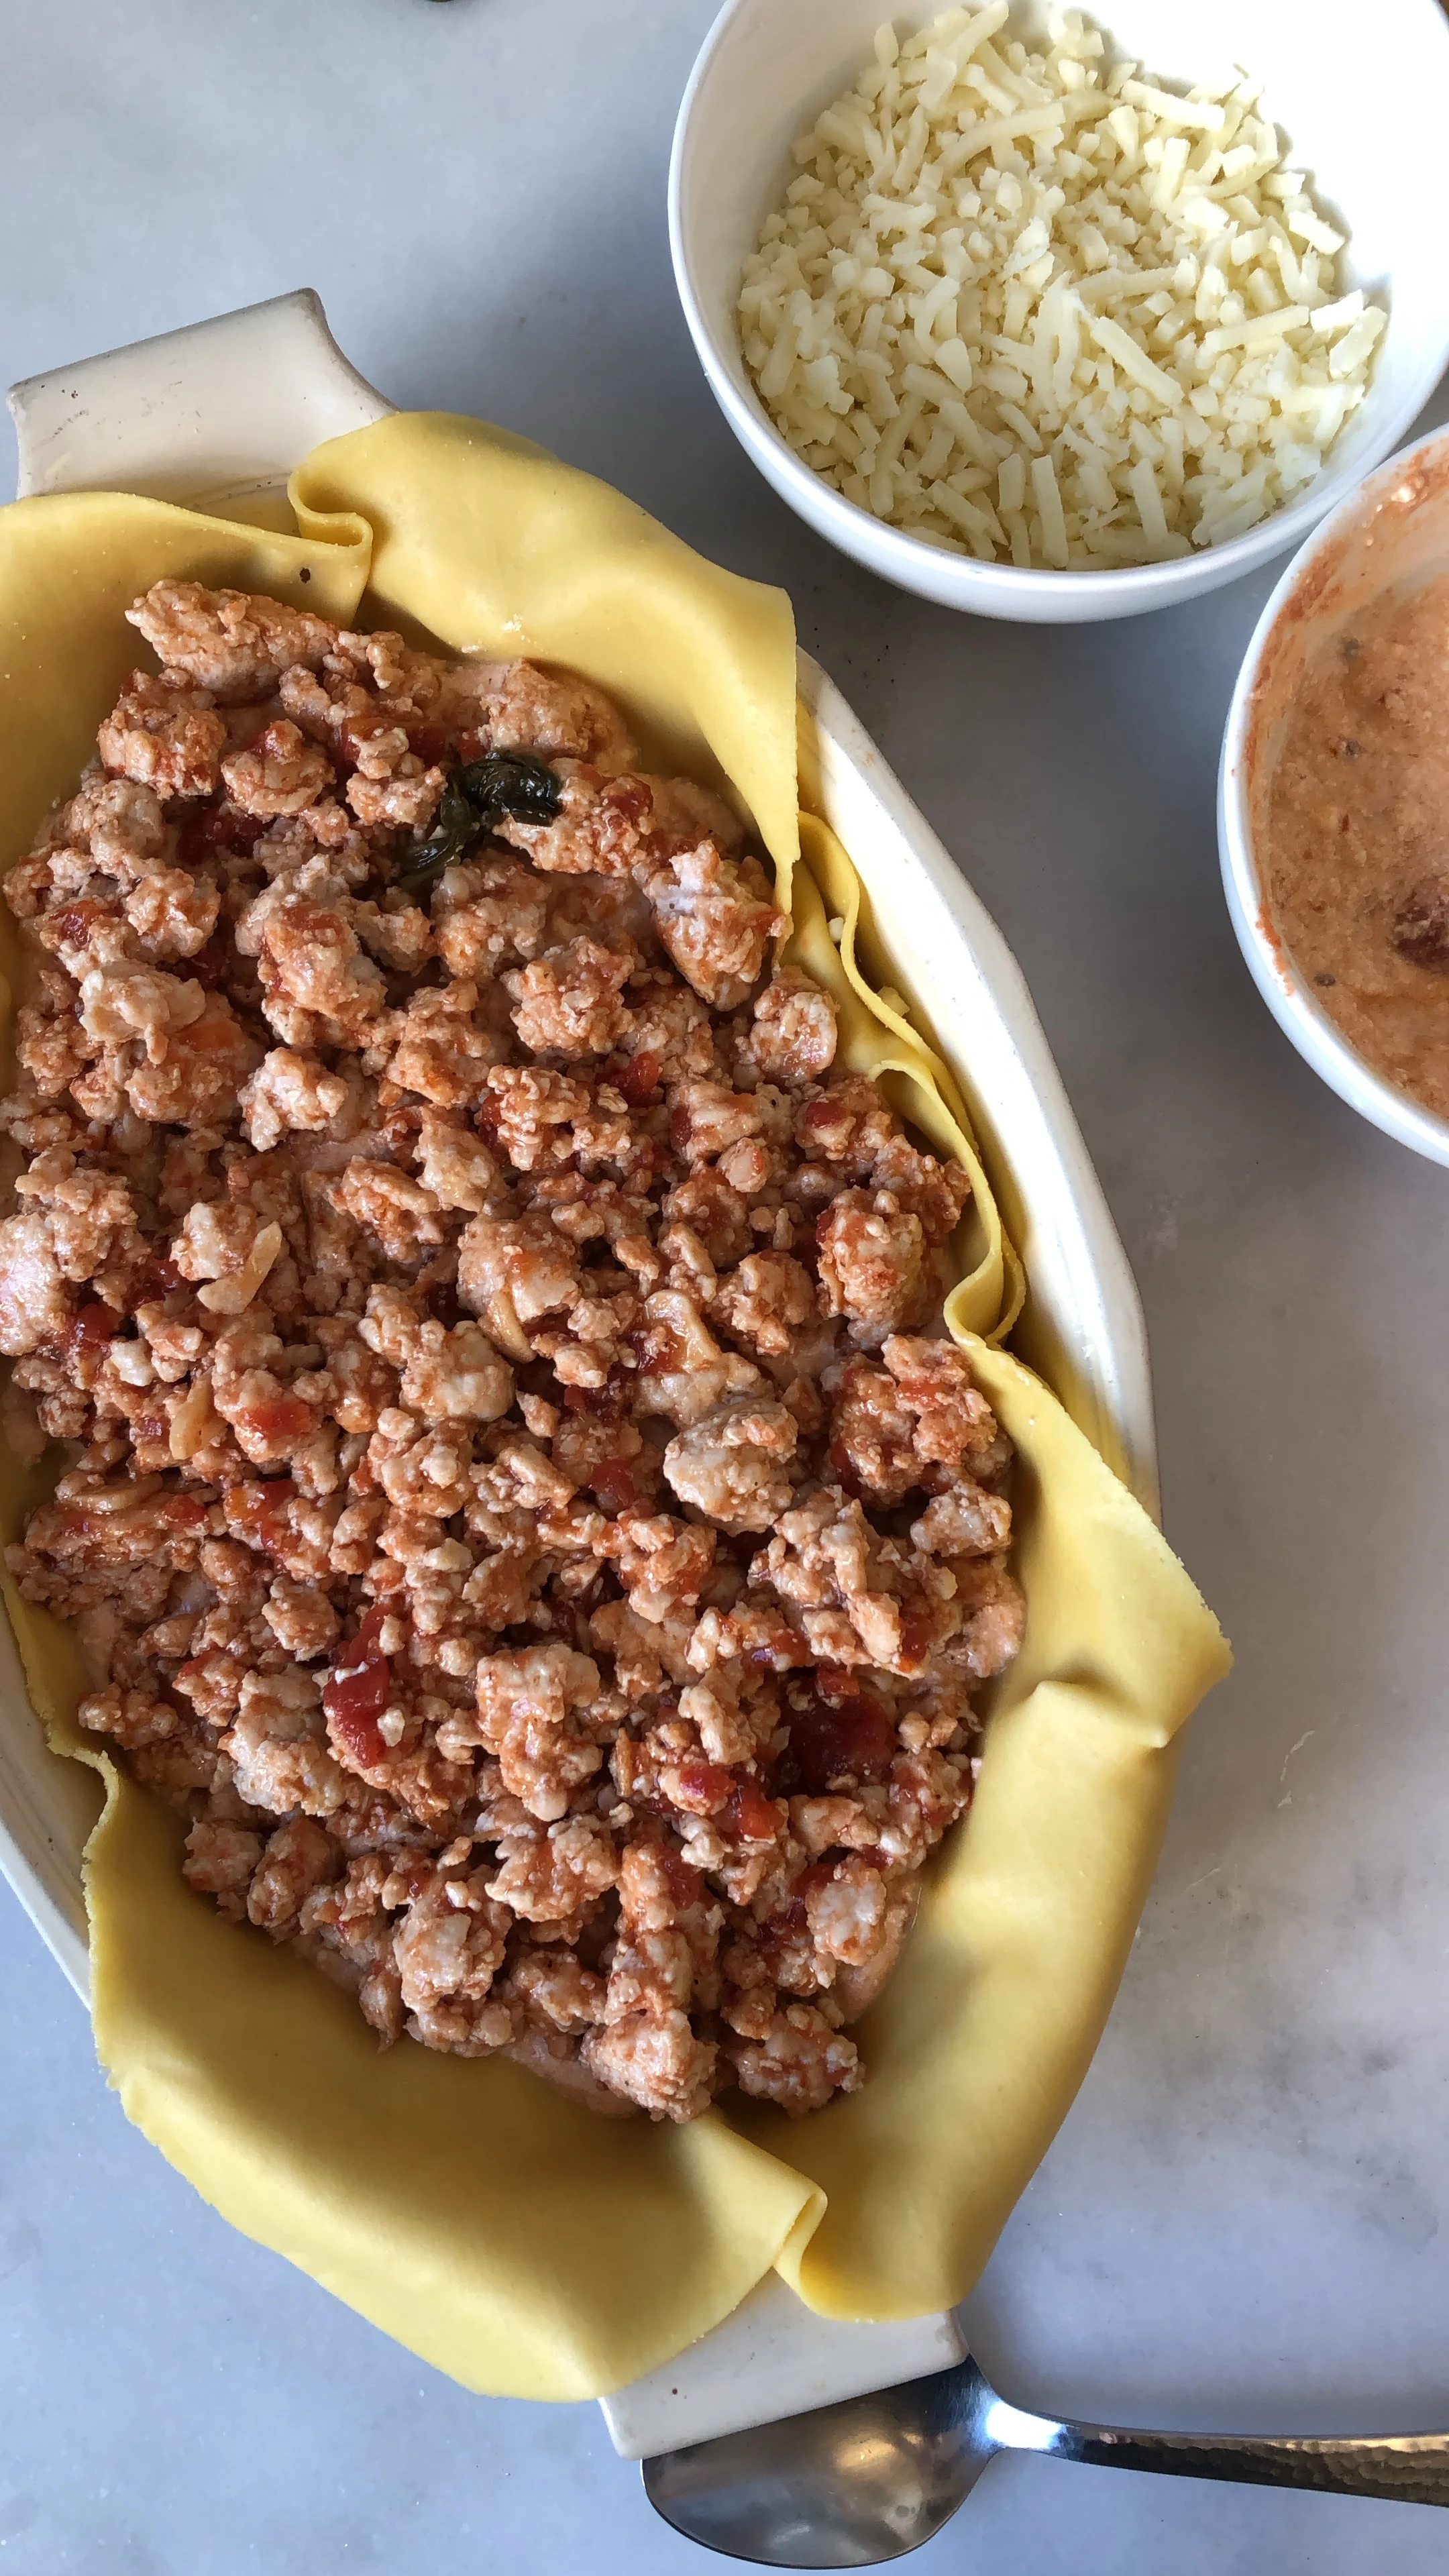
Spread out 1/4 cup of sauce onto the bottom of the baking dish. Place the first layer of lasagne on the bottom. Spoon in a generous layer of the ricotta egg sauce mixture (about half) on top of the noodle.
Place one layer of zucchini slices on top. Sprinkle with almost half of the fresh basil. Sprinkle on a layer of mozzarella (I used 1/4 cup). Add the next noodle layer. Spread the remaining ricotta egg and sauce mixture onto the noodle. Add a thick layer of ground turkey. The 9 inch oval baking dish accommodates the whole pound, but that may vary depending on what you use. Sprinkle another round of fresh basil all around and top that with 1/4 cup shredded mozzarella. Add dollops of sauce.

Note: you can eliminate the meat here and just use an additional layer of zucchini or any sliced veggie of your choice!

assembling the layers for Lasagne Lattice Pie

Making the crust

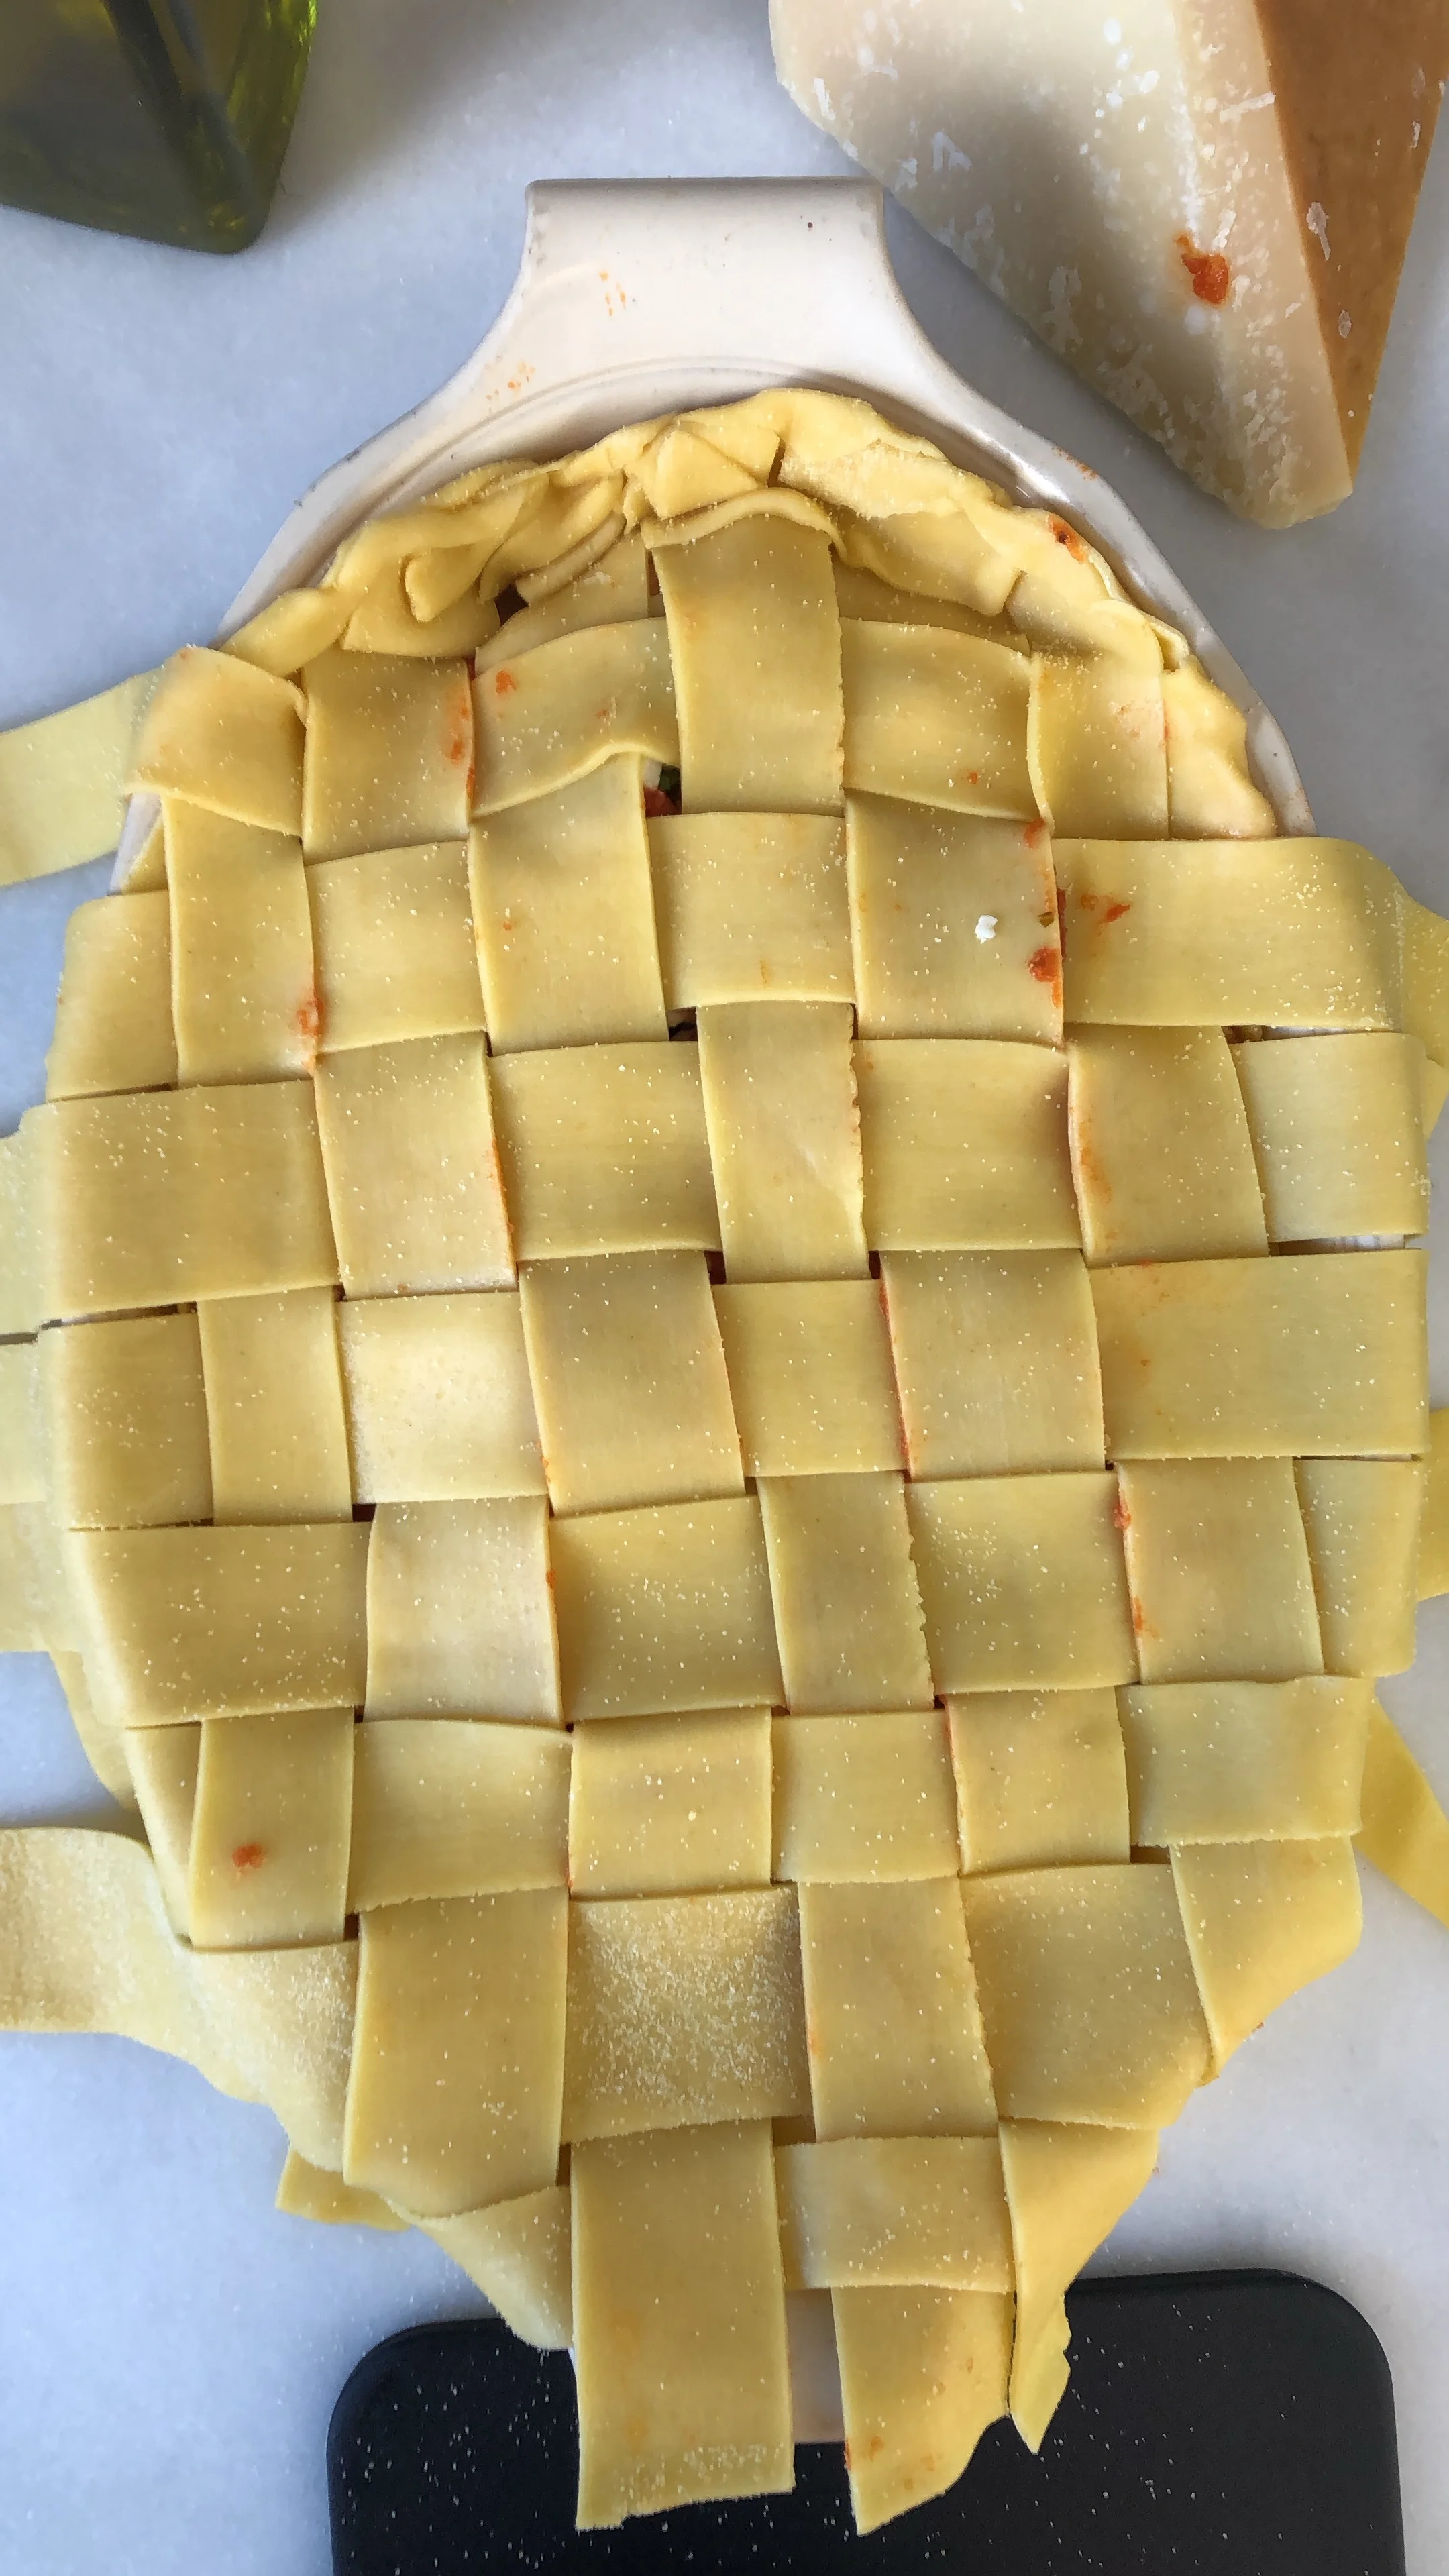
Slice lasagne sheets into fairly even ribbons. Mine were about 1.5-2 inches wide. They should be longer than your baking dish. Lay them side by side in one layer, lengthwise. There will be overhang on both sides and we’ll use that later to form a crust. Using an over-under method, insert noodles crosswise and side by side to create the lattice.

Use a scissors or a sharp knife to cut off any excess that’s exceptionally long. You can use those later to make pasta- because why not? Use your fingers and pinch together the noodle ends around the edge of the baking dish. Pinching together and tucking in the pasta will form a sort of crust and it is absolutely divine when baked. Brush all around with olive oil and make sure to get that crust. Spread a thin layer of sauce all around the top, and top with cheese. Make sure to go easy on the cheese in some spots so that the fruits of your labor - the lattice work - shows through!

p.s. - you can make these in various shapes. I tried my hand at a round pie and small pies too!

Baking the Lasagne

Cover with foil or parchment and pop into a preheated 375 degree oven for 30 minutes. Remove the cover and bake for another 25-30 minutes. At this point, you can add more mozzarella and place under the broiler for 2 minutes, but if you don’t want to add more cheese, you’re done! Enjoy!

round lasagne lattice pie
Mini Lasagne Lattice Pies

Roasted Tomato Soup with Grilled Cheese Croutons

Though only one of my 3 kids likes tomatoes, Tomato Soup is something that all 5 of us love, so it’s in steady rotation around here. 🍅

tomato soup with grilled cheese croutons

I love to freeze perfect summer tomatoes to use for this in the winter, but the truth is, we eat tomato soup often, and my stash disappears quickly. I’m grateful for canned tomatoes for this exact reason. For my 2 kids who eat dairy, crispy, melty grilled cheese croutons are the thing that makes this meal an absolute favorite!

This soup freezes beautifully, it’s made in the blender and works well for lunch, making it an all around win! Of course, this meal can be made gluten free by using gluten free bread, and it can also be made dairy free by using dairy free cheese.

tomato soup with grilled cheese croutons lunchbox

Roasted Tomato Soup 
(serves 3-4)

2 beefsteak tomatoes, cut into chunks
1 medium red onion, sliced 
1 bell pepper, cut into chunks 
1 large clove of garlic, peeled and smashed
2 tablespoons olive oil 
3 teaspoons fresh thyme, divided
28 ounce can whole, peeled tomatoes
4 cups vegetable broth
3/4 teaspoon kosher salt, or to taste
Fresh black pepper to taste
1/2 teaspoon sugar (optional)
1/8 teaspoon cayenne (optional) 

Method
Preheat the oven to 375 F. Line a baking sheet with parchment paper and add the chopped fresh tomatoes, onions, peppers and garlic. 
Drizzle with olive oil and sprinkle with 1 1/2 teaspoons of fresh thyme. Roast for 15-20 minutes or until the vegetables have softened and become fragrant. 
Place the roasted vegetables into a blender. 
Add the canned tomatoes (including juices), vegetable broth, remaining fresh thyme, salt and pepper. 
Blend together until smooth. Taste to determine whether more salt or pepper is needed. If you find the flavor too acidic, you can add 1/2 teaspoon of sugar. If you like it spicy, you can add cayenne.

Grilled Cheese Croutons
4 pieces of sourdough bread
4-5 ounces sharp cheddar cheese
1-2 tablespoons unsalted butter

Method
Preheat the oven to broil.
Place sourdough slices on a baking sheet lined with foil and smear butter on one side of each slice. Place that butter side down and add cheese on top of each slice. Place into oven, open faced.
Broil for 1-2 minutes or until cheese is nice and melty.
Place two open-faced sandwiches together to create two closed-faced grilled cheese sandwiches. Let cool for about 5 minutes and cut into crouton chunks.

tomatoes

Cranberry Orzo Salad

Cranberry Orzo Salad

Thanksgiving season is here, and cranberries are calling my name.

I’m excited to join with Square Meal Round Table for an ingredient-based collaboration and show you this delicious salad that revolves around the sweet, tart flavors of fall’s best red friend. I’ve used fresh cranberries for this recipe, but it also works with frozen cranberries, making it perfect to enjoy all year. It’s also wonderfully adaptable; you can substitute white or brown rice in place of the orzo to make it gluten free, and if you can eat nuts (unlike me) you can use toasted almonds in place of the pepitas.

This works beautifully as a side salad, but it can also be front and center for your meal. Zingy citrus, tangy roasted cranberries, delicate pasta and some slightly crunchy pepitas all come together to make a satisfying #yesyoucranberry dish. Scroll down below the recipe to see what other folks are making with this season’s best and brightest berry. Many thanks to @squaremealroundtable and @whatannieseating for organizing this virtual Cranberry Fest!

roasting fresh cranberries

Cranberry Orzo Salad

ingredients for cranberry orzo salad

Ingredients
2 cups cooked orzo
1/2 cup fresh cranberries, halved
1 medium navel orange, peeled, seeded and cut into 1 inch chunks
1/4 cup diced red onion
1/4 cup chopped fresh parsley
1/4 cup pepitas (you can toast these if you’d like)
1/4 cup dried cranberries
3 tablespoons olive oil, divided
1-2 tablespoons lemon juice
2 teaspoons honey
1/2 teaspoon orange zest
salt and pepper to taste

Method
Preheat oven to 400 degrees F.
Place sliced cranberries on a parchment paper lined baking sheet and drizzle with 1 tablespoon olive oil. Roast for 20 minutes and set aside.
While the cranberries are roasting, place the cooked orzo into a large bowl and add orange chunks, red onion and lemon juice. The acidity of the lemon juice and orange will soften the bite of the red onion.
Next add the parsley and pepitas and thoroughly combine the ingredients.
Add the roasted cranberries, including any oil that remains on the baking sheet to the orzo bowl and stir again.
In a small bowl, whisk together the remaining olive oil with honey and orange zest. Pour this dressing over the orzo and combine all ingredients. Season to your liking with salt and pepper.

If you make this and post it, tag me (@lalalunchbox) I’d love to see!

Cranberry Orzo Salad

Check out these other lovely accounts to see how they’re featuring cranberries!

everythingyouwanttoeat: https://everythingyouwanttoeat.blogspot.com/

SquareMealRoundTable: http://www.squaremealroundtable.com/recipes/cranberry-orange-streusel-pie

WhatAnniesEating: WhatAnniesEating.Com

RonnieVFein: http://www.ronniefein.com/blog/on-hanukkah-lets-not-forget-that-a-woman-played-a?rq=Cranberries

BeeAndTheBaker

rumblyinmytumbly:_www.rumblytumbly.com

Pieceoflovepastries: www.pieceoflovepastries.com

pricklyfresh: http://www.pricklyfresh.com/

floursinyourhair: www.floursinyourhair.com

Thehealthysins: www.thehealthysins.com

shortgirltallorder: https://shortgirltallorder.com/vegan-cranberry-orange-sweet-buns

aforkfulofyum: www.aforkfulofyum.com/http://aforkfulofyum.com/chocolate-cranberry-almond-bars/

Easy and Delish: https://www.easyanddelish.com/

siftandsimmer: https://www.siftandsimmer.com/white-chocolate-cranberry-cookies/

simpleandsweetfood: https://www.simpleandsweetfood.com

its_a_vegworld_afterall: www.itsavegworldafterall.com

my.recipe.addiction

occasionallyeggs: occasionallyeggs.com

annielcampbell: annie-campbell.com

Miminew: Https://www.theherbandspoon.com

cleanplateclb: www.cleanplateclb.com

fufuinthekitchen: https://fufuskitchen.com/cranberry-orange-biscotti/bavettemeat.com

holajalapeno: www.holajalapeno.com

joyosity: https://the-cooking-of-joy.blogspot.com/2016/12/cranberry-curd-tart.html

jessiesheehanbakes: https://www.jessiesheehanbakes.com/2017/12/06/cranberry-buckle/

whatskarencooking: whatskarencooking.com

Champagneandcookies: www.champagneandcookies.net

cooking.again:www.reencontrandomeconlacocina.wordpress.com

thebutterywhisk: www.stephaniesuen.com

wildflourchi:www.wildflourchi.com

lemonthymeandginger: www.lemonthymeandgigner.com

katherineinbrooklyn: www.katherineinbrooklyn.com

myberkeleykitchen: www.myberkeleykitchen.com

Ciao Chow Bambina: https://www.ciaochowbambina.com/cranberry-pecan-cracker-spread/

cosetteskitchen: https://www.cosetteskitchen.com

bakingthegoods: http://bakingthegoods.com/2017/11/13/cranberry-apple-brown-butter-crumble-pie/

thekitchensinkblog: www.thekitchensinkblog.com

justdatesyrup: www.justdatesyrup.com

katiebirdbakes: https://www.katiebirdbakes.com/cranberry-sauce-breakfast-rolls/

crumbtopbaking: https://www.crumbtopbaking.com/cranberry-orange-overnight-oatmeal-muffins/

thebakingfairy: http://www.thebakingfairy.net

tinykitchencapers: http://www.tinykitchencapers.com/white-chocolate-cranberry-oatmeal-cookies/

ChefDanielaGerson: https://wavesinthekitchen.com

sixsnippets

pieladybakes: https:/youcanliverichonless.com/cranberry-tarts/

ThePieous: Www.PiesAreAwesome.com

Bappy Girl: https://bappygirlyum.blogspot.com/


DIY Family Meal Ideas

I grew up with family dinners pretty much every night. I’m not sure how old I was when it started, but the memory is a strong and happy one. Some days I feel awful that I can’t figure out how to make this happen with my own family. My kids eat dinner at 5:30, and most nights, my husband isn’t home that early. Perhaps family dinner will come at some point for us, but it’ll have to be when the kids go to bed later, and I don’t see that happening for a while.

There are days I feel terrible about this. I’ve read article after article about the benefits of daily family dinners. Somehow though, we can only make it work on weekends. And even then, sometimes it’s only on Sundays. I guess it’s better than nothing. Most nights, I serve my kids dinner and sit with them while they eat. Sometimes I eat dinner with them, and sometimes I wait until later.

What I’ve noticed over the years is that regardless of the number of parents at the table, a fun, interactive dinner vibe makes the rest of the evening flow more smoothly. Most nights, we play a game called ‘Petals and Thorns’ where we go around the table and talk about the best part of our day (the petal) and the worst part of our day (the thorn) to get the conversation going. Beyond that, food that gets the kids talking makes the evening more fun. Enter: DIY meals.

Here are some of our favorites lately:

DIY Sweet Potato Bar

DIY Sweet Potato Bar

Sweet potatoes are fabulous all year ‘round, and this dinner hits all the high notes with me and my crew. You can make it hearty with bacon and cheese; it’s a great way to add veggies with broccoli, peppers, onions or radishes; it can be sweetened with cinnamon; it can be spicy and sharp with salsa and scallions.

Here we’ve got bell peppers, scallions, caramelized onions, salsa, cheese, radishes, sour cream, avocado, broccoli, cinnamon, bacon and pea shoots. Something for everyone! You can also add black beans, leftover chicken… the sky’s the limit!

DIY Tacos

DIY Tacos

Raise your hand if your family loves tacos! My family loves them, but they each have different opinions about what should be included. Having the ability to customize makes everyone happy. And here’s my favorite part about this meal: leftovers are absolutely divine. Here we’ve got grilled chicken, guacamole, red onion, avocado, cilantro, lettuce, radish, beans, tomato and cheese. There’s salad and brussels sprouts on the side, but this dinner has no rules… those are welcome to go in too!

 
Toast Bar

DIY Toast Bar

Breakfast for dinner is always a hit here, and lately we’ve been all about banana toast. Offer some various breads, nut butters, jams and fresh or dried fruit and you’ve got something magical. The best part here is that you can go sweet or savory. Add smashed chick peas or hummus, leftover chicken, avocado, and it’s a whole new angle!

My favorite thing about DIY Toast is that you’ve got options to keep it simple or make it more complex. Either way, make sure to start with some really amazing bread!

DIY Wafflewiches

DIY Wafflewich

If you’re into the DIY Toast idea, you are definitely going to love my DIY Waffle Bar. It starts with homemade savory waffles (recipe here) and grows from there. This can be wonderful for any meal, not just breakfast.

Bonus points for serving a rainbow of colors. :)

Our family favorites include cheese, bacon, jam and avocado. Here we also have berries, cream cheese, radish and tomato.

Do you have DIY meal favorites? I’d love to hear about it! Shoot me an email or let me know on Instagram or Facebook. If you make one of these meals and post it, be sure to tag @lalalunchbox #lalalunchbox!

Clementine Cupcakes

Clementines are a thing of beauty. They're juicy, flavorful, high in vitamin C, perfectly transportable, easy to peel, easy to eat. The list goes on and on. Am I right? Plus, they've got to be one of the best accoutrements for a Halloween lunch. Just draw a pumpkin face on the peel and call it a day! 

Clementine Pumpkin

After buying two bags of clementines, I wanted to get creative with them. How about Clementine Cupcakes? My son was on board immediately. My older daughter and her friend bake together every Monday, so as it turned out, I didn't have any white sugar in the house. I used maple syrup instead and am happy to report that it worked out beautifully for these cupcakes! These cupcakes have a bold citrus flavor, so if you're looking for more of a "hint" of citrus, reduce the amount of zest that you use. I’ve also added cardamom to add brightness to these cupcakes, and I’ve made them dairy free by using olive oil. The flavor of the olive oil really comes through here, so choose something fruit and flavorful. I paired it with a chocolate sour cream frosting, (because chocolate) and that recipe is also below. 

Clementine Cupcakes

Clementine Cupcakes

Ingredients

1/4 cup + 2 tablespoons olive oil
1/2 cup of maple syrup
2 large eggs
zest of 3 clementines (or one tightly packed tablespoon)
1/2 cup of orange juice (or a combination of freshly squeezed orange, lemon and clementine)
1 teaspoon vanilla extract
1 1/2 cups flour
1/2 teaspoon salt
1 teaspoon baking powder
1/2 teaspoon baking soda
1/2 teaspoon cardamom
clementine segments for garnish

* Preheat the oven to 350. 
* In a large mixing bowl, combine the olive oil and maple syrup.  Slowly add in the eggs. Once thoroughly combined, add the zest, orange juice and vanilla extract. 
* In a separate bowl, mix the dry ingredients together. 
* Add dry ingredients to wet ingredients and use a whisk to make sure there are no clumps. 
* Pour into a muffin tin lined with paper cups and bake for 20-24 minutes or until a knife comes out clean. This recipe makes 12 small cupcakes, or 10 large ones.

Chocolate Sour Cream Frosting

What you'll need: 
1/2 cup sour cream
1 cup semi sweet chocolate chips, melted
1 teaspoon vanilla extract
1/4 teaspoon salt

Once the chocolate chips are melted and slightly cooled, add the sour cream, vanilla and salt. Mix thoroughly. This recipe will make more than enough for your cupcakes, which is a good thing because it's kiiiiiiiiiind of irresistible! Garnish the cupcakes with clementine segments and enjoy!