Omega 3s and Kids. Where and Why?

In general, my family eats a well balanced diet. Whole grains, lean meats, lots of fruits and vegetables. But because of my severe food allergies, there are certain foods that are never even brought home, like fish and certain tree nuts. All those health benefits of fish? Unfortunately we don't reap them. Here's the bad news: as it turns out, fish and nuts have really high amounts of Omega 3 fatty acids, hailed as nutrition superstars. They are said to help the body reduce inflammation (and therefore help with things like heart disease and arthritis), reduce triglycerides, improve brain function and aid things like fatigue and dry skin. And according to Parenting.com, "Low levels of DHA [an Omega 3 fatty acid] in children have been linked to an increased risk of ADHD, vision problems, and depression." Thanks to my allergies, we all have to be more creative to get our fill so we don't fall into a pit of Omega 3-deprived despair! Ugh.

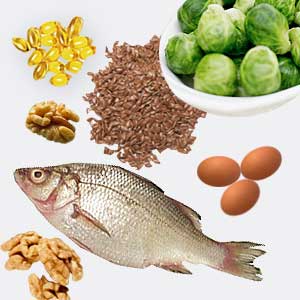
Here's what I've learned: There are three types of Omega 3 fatty acids: ALA, DHA and EPA. ALA (alpha-linolenic acid) is primarily found in plants like nuts, beans, flaxseeds and leafy greens. DHA and EPA are found mostly in cold water fish like salmon and sardines. DHA can also be found in fortified milk, eggs and other dairy. I found this slide show about the top sources of Omega 3s interesting. 
So okay - back to the action plan. For anyone like me who can't have the so-called "best" sources of Omega 3s, you can buy organic eggs with added Omega 3, other dairy fortified with Omega 3. Frankly, I have no clue how Omega 3 can be added to eggs so I need to do more research.  Another option is to include flax, spinach and green leafy vegetables as a regular part of your diet. My husband and I eat loads of leafy greens but beyond the Weelicious Green Monster smoothies, my kids really don't. I've started adding flaxseed meal to almost everything I make for the family (pancake batter, oatmeal, baked goods, cereal, smoothies, salads) but I just read that the best benefits come if you grind them right before using. Man! I'm using these anyway and keeping fingers crossed that we can get at least some of the benefit.  

I grew up on Flintstone's vitamins. Do I need to give my kids a supplement of some sort for them to get the benefits of Omega 3 fatty acids? Google "Kids Omega 3s" and a whole host of supplements and vitamins turns up in the results. In truth, I'm hoping that if Omega 3 fatty acids are, in fact, as beneficial as they are touted to be, that scientists figure out some non-fish, non-nut based way to unlock their awesomeness that doesn't involve me manually grinding seeds on a daily basis. 

BanaVocado Bread

I really love Twitter. Thanks to a tweet from @RecipeGirl, I came across this recipe and whipped up what we're affectionately calling BanaVocado bread. BTW - cannot wait to check out the recipes in her upcoming cookbook (due out this Spring!) 
The original recipe, provided by the California Avocado Commission, is called Avocanana Bread but I've modified it slightly (recipe below) and added an extra banana and thus, changed the name. I love avocados and never would have thought to include it in this kind of baking so I'm grateful to have come across this one! 

IMG_0053.JPG
IMG_0055.jpg

I usually use applesauce or kefir to provide moisture, texture and flavor to my banana breads. And we make loads of banana bread and banana muffins around here, as you can see here and here. We always have avocados in our fruit basket so this was really easy to whip together. The outcome? Moist, flavorful and rich tasting banana bread. We use an extra banana sliced on top in every banana bread nowadays. I've cut the sugar substantially from the original recipe and used soy milk instead of buttermilk because we're dairy free these days

Here's the recipe as I've modified it. This is definitely a keeper!

Ingredients

  • 1/3 cup old-fashioned oats
  • 1 cup all purpose flour
  • 1 tsp. baking powder
  • 1 tsp. baking soda
  • 1/2 tsp. salt
  • 1 tsp. cinnamon
  • 1 ripe, Fresh California Avocado, seeded
  • 1/4 cup canola oil
  • 1/2 cup (packed) brown sugar
  • 2 eggs
  • 3 very ripe bananas
  • 1/4 cup soy milk

Instructions

  1. Grease an 8 x 8  inch pan (bottom and sides).
  2. Preheat oven to 350 degrees F.
  3. Combine dry ingredients: oats, flour, baking powder, baking soda, salt and cinnamon. Set aside.
  4. Scoop the avocado into a large bowl and mash lightly. Add 2 bananas and mash together.
  5. Add oil and brown sugar to the avocado. Mix well. 
  6. Add eggs, one at a time.
  7. Combine dry ingredients with wet ingredients. 
  8. Stir in  soy milk and mix well.
  9. Pour into prepared pan and add the final banana on top, sliced. 
  10. Bake in preheated oven for approximately 50 minutes. 

Cold and Flu Season are No Match for This Soup

I wholeheartedly believe in the connection between what we eat and how we feel. If someone has a cold coming on, I make chicken soup. Got a cough? Have a pear. Have a sore throat? Slice up some fresh ginger and add to hot water. So when cold and flu season is upon us - even before anyone gets sick, I always make loads of carrot soups. Carrots are high in beta carotene which is thought to help build a strong immune system. My son hates raw carrots but loves this soup. My daughter loves carrots in all forms so this is always a welcome item to the dinner table for her. Added bonus: carrot soups freeze beautifully. 

carrot sweet potato ginger soup.JPG

Yesterday I made a batch of carrot ginger soup and added sweet potato - a super food that is also high in beta carotene. Look here for a great list of super foods that fight colds. The news stories about this year's flu season are a little overwhelming. Nothing is fool proof, of course, and even people who eat the healthiest of diets get sick every now and then. Hopefully this easy-to-make soup and the other healthy stuff that comes out of our kitchen will provide us with some extra protection.

Carrot Soup with Ginger and Sweet Potato

1 lb carrots - peeled and cut into chunks
2 sweet potatoes, peeled and cut into chunks
1/3 bunch of fresh dill
2 inch piece of fresh ginger, peeled and chopped
1/2 red onion, chopped
Juice of one lemon
salt and pepper to taste
1/4 tsp cayenne (optional)

Add carrots, sweet potato, ginger, onion and dill to a soup pot and cover with water. Bring to a boil and simmer for an hour. Add the lemon juice, salt and pepper and puree with a stick blender.

** For added richness, you can use chicken broth instead of water or you can add a can of great northern beans to add protein and thickness.

Day Planners for Toddlers? Yeah!

My grandfather was a textile wholesaler. As a kid, I used to think he just liked buying felt; he had what seemed like mountains of it in every color possible in his basement. Felt is soft, yet durable. It plays nicely with glue and the vibrant colors that you can find make it perfect for all kinds of crafts. So when it came time for me to design and create the day planner for my son (2.5 yrs old), felt seemed like the perfect fit. 

What?! A day planner for a toddler? It probably sounds crazy, but this craft project is perfect for helping my little guy understand how his week is organized and helps solidify the foundation for understanding time and routine. Check it out: 

IMG_0148.JPG

See the happy face with the purple rock star hair? That represents my son. His favorite color is purple. He hasn't yet decided whether that's hair or a funny hat. There's velcro on the back of that face and it can attach to each day of the week. My son moves the face to the appropriate place each morning to signify a new day. Yesterday he discovered the Y in Wednesday, "like the Y in Remy, Mama!" Awesome. 

At the bottom are photos of all of his preschool teachers, his grandma and his babysitter - the people he sees regularly during the week. He attaches their photos to the velcro squares below the day rectangles to show that those people are part of that day. People who aren't part of that day are kept in the green area at the bottom. Over time, the repetition will help him understand the rhythm of the week, the names of each day and the flow of one day to the next: he goes to preschool on Tuesday, Thursday and Friday; Grandma comes on Wednesday; etc. 

I created a project nearly identical to this for my daughter 4 years ago when she was the same age. She felt empowered when she could name the days of the week. She loved knowing what lie ahead on a given day. In some ways, this project was the precursor to LaLa Lunchbox – the sense of order, organization and time that my daughter learned early on helped make lunch planning really easy in our house. And in our house, of course, we're all about easy lunch planning. Perhaps there's an app for the Toddler Day Planner at some point? 

Here's what you'll need:

  1. A 20x30 inch foam board. They come in lots of fun colors.
  2. Non-toxic glue - the kind that says something like "bonds most anything!"
  3. Vinyl letters. I used 1/2" for the weekday names and 3" for "Remy's Week"
  4. Felt! I used a different color for each day intentionally to underscore the distinction between each day. It's also great for color recognition. Each rectangular day measures 3 7/8" x 5". Each rectangle below the weekday measures 3" x 1 1/4" and the green rectangle that houses the photos measures 13" x 2 1/4". The diameter of the smiley face is 3". 
  5. Cardboard. The smiley face felt is glued to cardboard. I intentionally made it a face and not an abstract shape to strengthen the connection for my son.
  6. Velcro. I opted for the basic (aka non-industrial strength) kind and attached with glue. 
  7. Photos of your caregivers, teachers or anyone else who you want to associate the day with (1.5" x 1.5" mounted on cardboard). I could have used an icon, of course. Something to represent preschool. Something to represent a playground or some activity he might do with his babysitter. But life is all about people. It's made fuller by the people who we spend our time with, learn from and laugh with. Relationships matter. Children are nurtured and guided by grownups every day, so I chose the focus of this project to be all about the who - not the what or the where. I also chose not to have photos of our family. We are constants. We are a given. Every day, no matter what. 

Here's how to assemble:

  1. Cut the felt to the appropriate sizes. 
  2. Cut the cardboard for the face and the photos. 
  3. Create the face design and glue to cardboard. 
  4. Glue the felt rectangles to the foam board. 
  5. Attach the vinyl lettering. 
  6. Place the velcro squares on each day and on the rectangles below them.
  7. Print out the photos and glue to cardboard. 
  8. Attach the felt at the bottom - it may be bigger or smaller than mine based on the number of photos you have. 
IMG_0093.JPG
IMG_0109.JPG

Enjoy! 

Spinning tops, Kaleidoscopes and Wummelbox oh my!

We received a Wummelbox in the mail last week. Wummelbox! How fun is that name? My daughter had a grand ol' time saying "wummelbox" over and over to her own little jaunty tune. And when her cousin came over to play this past weekend, they opened up the Wummelbox to check out what was inside. (Psst! Coupon for LaLa Lunchbox readers below)

IMG_0082.JPG

Three craft projects! Plus a pair of kid friendly scissors and a box of crayons. Wummelbox was off to a good start. So what is a Wummelbox anyway? It's a monthly arts and crafts subscription designed for 3-7 year olds. The Wummelbox team sources their materials from Germany and Europe, according to their website and I've been told that their goal is to use naturally sourced materials as much as possible with as little plastic as possible. In full disclosure, I was sent a Wummelbox to test out and had agreed to review the product only if my kids enjoyed it. 

IMG_0089.JPG
IMG_0092.JPG

Back to the box - the first project was a spinning top.  The kids drew on paper cut to fit the top and screamed with delight to see how their designs and colors appeared when the top was in motion. Even my sister got in on the action and created a design of her own. Beyond the fun of designing, the kids loved spinning the top and seeing whose lasted longest, whose was brightest, whose traveled farthest, etc. This was a fun project! 

The next project was creating a kaleidoscope. This was full of promise, complete with sparkly goodness. Left to their own devices, with my daughter and niece reading the instructions and executing by themselves, this didn't go as smoothly as the first project but it was because my daughter had accidentally inserted a part backwards. Once that got straightened out, excitement abounded.

The Wummelbox materials were sturdy, the kids were entertained and proud of their work. Best of all, they are looking forward to creating the third and final project in the Wummelbox this coming weekend: the wind catcher. Based on our own experiences, I'd recommend Wummelbox to anyone whose kids enjoy crafting. It was a lovely way to spend the morning.  

Want a coupon to test out Wummelbox for yourself? Enter this code: lalalunchbox to get 20% off a three month trial until February 15.

Enjoy!